Showing posts with label paper. Show all posts

Tuesday, 26 October 2010

Christmas wish list......

I've just discovered some beautiful papers to put on my wish list for Santa. The stack is called Classic Christmas by S.Dyment. It's a paper and die cut pack and the papers come with some really beautiful red foiling too. The pack is not just paper but also two sheets of die cut notelets that you could use as toppers for cards, embellishments for Christmas layouts, or even gift tags. Best of all it's only RRP £7.99 for the 12 x 12, £4.99 for the 8 x 8, or £3.99 for the 6 x 6. 

They also do a range of matching products to go with these papers, check out Docrafts to find out more, or click here. 

Wednesday, 7 July 2010

Cocktails in the sun.

I made this page after my sisters came to celebrate my birthday with me oin April. I love the cherry print background paper behind the photos and have been looking for a way to incorporate it into one of my pages for a while. We all sat in the garden and had some cocktails, so I put the journalling into a cocktail glass for an unuaual effect. It was a really fun day so i used fun prints and bright colours to reflect this.


Thursday, 25 February 2010

My wishlist........

I don't know about you but my favourite crafting product is paper. Yes paper, I love the stuff. If I'm stuck for inspiration I just flick through my paper stash until I find one that inspires me to start a new project. However, last night while flicking through my paper box, I noticed that it was getting a little empty!!!!! So here's my wish list for what I want to fill my empty box with.........

1. Cosmo Cricket Early Bird 6x6 paper, 36 sheets.
RRP £6.75.
I love these papers, they are quite bright and fun and match all my spring time projects.

2. Cosmo Cricket Double Deck Lil' man and snorkel, 12x 12, 48 sheets.
RRP £23.99
I thought these would be fun for my summer scrapbooking.


3. Papermania signature range, Regency A5 paper pack, 48 sheets, 12 designs.
RRP £6.99
I l;ove the muted soft colours in this collection, and thought this would be nice to indulge my girly side.


4. DCWV, Safari Chic Stack, 48 sheets, 24 designs, 12x12.
RRP £19.99
I love the animal inspired prints and tribal designs, plus the paper's textured too.


5. K and Co Paper flowers,24 double sided 12 x 12 pages of flowers, leaves and extras, there are 578 die-cut pieces ready to fold and embellish.
RRP £14.99
I really fancy giving these a try. They are something new that I haven't tried before and I love the K and Co patterns and colours.

Saturday, 2 January 2010

K & Co Paper Purses.


This is a great product. K and co Paper purses.


You get 32 pages of die cut and pre scored 3D paper purses. Some pages have two purses on, some only one.


They come in beautiful pastel colours and you also get some die cut decorations to go with it.


These are perfect for putting little gifts of sweets, homemade jewellery or little smellys in.


Here are few of mine.


Give it a try. x

Friday, 4 December 2009

Free Daisy and Dandelion Papers On DoCrafts Website!!!!!

I just love Daisy and Dandelion and have brought several of their products, so I was delighted to discover there are free downloads containing these lovable dogs on the Docrafts website. There are two sets of backing papers and some decoupage to choose from. So join Docrafts and try it yourself!!!


This set is my favourite!!!!!!!!!!


You could also check out http://daisyanddandelion.blogspot.com/ for some inspiring ideas on how to use these beautiful products.

I buy mine from http://www.madaboutcards.com if I don't want to go out in the cold,or the Paper Mill shop when I'm out and about.

Give these cute characters a try.

Wednesday, 2 December 2009

Gatefold Glory

As all cardmakers can testify always making regular A5 cards can become a little mundane. So why not try a gatefold card instead?


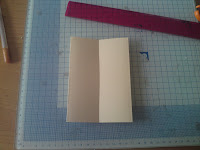
How to make a gatefold card.

1. Start with an A4 sheet of card.


2. With a ruler find and mark the centre with pencil.

3. Fold one side in to meet the centre.


4. Repeat on other side.

5. Rub out pencil maerks and decorate (inside and outside).


Thursday, 19 November 2009

Cute Companion Window

I made this beautiful card using free Cute Companion papers from Creative Cardmaking issue 9. I just loved the cute window image and decided to add a wintery background through the window by cutting out the window panes and adding a snowflake background paper behind it and also some glitter (well it is Christmas). I thought it would be fun to add Santas sleigh flying across the window.


Wednesday, 18 November 2009

Spot The Difference

At the minute I'm going mad for polka dots. Spots look great either in bright colours or more subdued tones, and are perfect for any occaison and project. Here are some of my spotty designs to inspire you....

Dream with a strip of polka dots and a square of patterned paper.

Forever Friends with blue and white 'snow' polka dots.


Tigger on a red and green polka background.


Monday, 16 November 2009

Sorry!!!

Hi, sorry for the long absense, we moved house and internet access suddenly became alot more difficult, but I finally have my very own craft room, aren't I lucky???
Anyway, back to crafting:

I just love the new bare essentials range which includes various boxes, photoframes, gift wrap and desk/wall calenders all ready to be decorated.
photoframe:
Giftwrap:

The docrafts website has some stunning designs to inspire you. Go to http://www.docrafts.co.uk/asp/projects/project.asp?id=2266 to see my favourite.

I just brought mine to try out this week, I think they'll look great with the new Chatsworth paper collection. I'll let you know how I get on.... xxx

Thursday, 10 September 2009

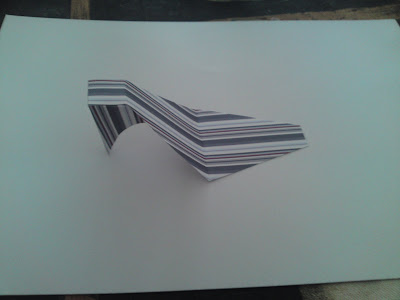
Sexy Shoes

Try these fabulous shoes for when a simple card just simply isn't enough!!! These shoes are fabulous to hold table presents, can be sent in a box in place of a card or simply for decoration in your home!!

I got this idea from a craft magazine. If anyone would like the templates please e-mail and I will send them to you.


Step 1:

Draw around the template labelled "bottom" onto coloured paper or thin cardstock, cut out and fold where indicated.


Step 2:

Glue the tabs underneath to form the heal of the shoe.


Step 3:

Draw around the template labelled "top"onto coloured paper or thin cardstock, cut out and fold where indicated.


Step 4:

Glue the tabs under the sole of the shoe, I find double sided tape works best here.


Step 5:

Draw around the template labelled "toungue", cut out fold where indicated and glue in place.


Step 6:

Decorate!!!! ( I used ribbon to make an ankle strap and a chipboard shape as an embellishment)


Tuesday, 8 September 2009

Picture Frame


This is a beautiful idea that I stole from Create and Craft T.V. I give you the basic construction here but you can decorate this in any way you choose and totally change the look of this design. Give as a gift in a gift box, or send in place of a card.


To make:

Step 1- Start with a square of double sided card.


Step 2- Fold the square in half diagonally twice.


Step 3- Fold the corners into the centre to create a square.
h


Step 4- Turn over and fold the corners into the centre again.


Step 5- Fold the points out to the edge of the square to make a frame.


Step 6- Wrap ribbon around the triangles making up the frame and stick the points down to hold it in place.


Step 7- Decorate the centre. I used a sheet of pearlescent card and a decoupage snowman in the dark blue example and a photo of my beautiful poodle Teddy in the other.

Step 8- Turn over and fold down the two bottom flaps to make a stand.


Step 9-(Optional) Decorate the edges. I used peel off snowflake stickers on my snowman example.


Give it a try. You could also make Christmas decorations for the tree by threading ribbon through the top, or make photo frames by using photos in the centre as in my Teddy frame, or do what I did in my snowman example and just make pretty frames for any occasion.

Lucy x

Inspiration Ideas!!!

We have all suffered drom Crafters Block at one point or another, and it's not always easy to overcome. So I've compiled a list of top tips to help for when inspiration eludes you.


1- Visit haberdashery stores, the different textures, colours and patterns of the fabrics is sure to inspire. (This can also be done online for those of us who are a little lazier)

2- Reread old craft magazines. Magazines that have been gathering dust for months are full of ideas you wanted to try but never got round to. (Also craft books)

3- Visit blogs online. You can adapt any project to suit your own requirements by changing the colours, patterns, etc.

4- Craft fairs and shows. There are always lots of new products and demos to inspire.

5- Go through your photo albumn. Pictures of friends, family, nature, special occaisons, trips away etc will give you ideas.

6-Flick through your paper stash. Sometimes just looking at the different papers in your collection will get your creative juices flowing.

Hope this helps

Lucy x

Teabag Folding


I have recently discovered Teabag folding (and no this has nothing to do with your morning cuppa). This is a technique that is new to me but I've tried it and I love that you can get so many delicate shapes starting with just a square.

Top Tip: If you want to try this technique but don't want to invest in the teabag papers until you know you enjoy the technique try using squares of polka dot, plain or stripy paper for a slightly different look.

To make this card do the following:

Step 1- Fold a large teabag square in half with the patterned side going inwards.
Step 2- Unfold, then fold the paper twice diagonally with the pattern going outwards.

Step 3- Push inwards to create a triangle.

Step 4- Fold the points on the front upwards towards the top (this should look like a triangle behind a diamond)

Step 5- Repeat until you have four. Put the four together so the triangles create a square.

Step 6- Fold four small squares diagonally to make triangles and slot them behind the points of the square.
Step 7- Mat and layer onto paper and card, then finish the card off with ribbon, a greeting, and self adhesive jewels.

Hope you enjoy trying this technique as much as I did.
Lucy x